
Mengapa Lampu Strip LED Berhenti Berfungsi Setelah Dipotong?
Panduan Praktis oleh Lightstec (Produsen Strip LED Profesional)
Pemotongan lampu strip LED adalah praktik umum untuk instalasi khusus, namun teknik yang tidak tepat dapat menyebabkan kegagalan fungsi. Sebagai pabrik strip LED terkemuka, kami akan menjelaskan penyebab teknis dan memberikan solusi yang dapat ditindaklanjuti untuk klien Anda.

Alasan & Perbaikan Utama
1.Titik Pemotongan Salah
Strip LED memilikiikon gunting setiap 3–6 LED menunjukkan posisi pemotongan yang aman. Memotong di tempat lain akan memutus sirkuit internal, menyebabkan kegagalan sebagian atau total.
- ✅Memperbaiki:
- Gunakan gunting tajam atau pisau pada titik-titik yang ditandai.
- Untuk pemotongan yang tidak disengaja, uji kontinuitas dengan multimeter dan solder sambungan yang rusak.

2.Kerusakan Sirkuit atau LED Terbakar
Pemotongan akan memperlihatkan bantalan tembaga, yang dapat teroksidasi atau menyebabkan korsleting. Kelebihan LED yang tersisa setelah pemangkasan juga dapat membakar chip (terlihat sebagai bintik hitam).
- ✅Memperbaiki:
- Isolasi ujung potongan dengan pita listrik cair atau tabung heat-shrink.
- Ganti LED yang terbakar dengan menyolder chip 3V yang cocok atau memotongnya dengan kabel.
i cina")
")
cina")
")
")
cina")
3.Ketidakcocokan Catu Daya
Memperpendek strip mengubah persyaratan tegangan. Misalnya:
- Strip 12V/5m dengan 60 LED = 2,4V per LED.
- Memotong hingga 3m (36 LED) = 12V/36 LED = 3,3V per LED (kelebihan chip)
- ✅Memperbaiki:
- Menghitung ulang kebutuhan listrik:
Required Voltage = (Number of LEDs) × 3V - Ganti drivernya denganmodel arus konstan cocok dengan beban baru.
- Menghitung ulang kebutuhan listrik:
4.Polaritas Terbalik atau Kegagalan Pengemudi
Menyambungkan kembali potongan strip dengan kabel +/- terbalik dapat langsung merusak LED. Driver yang rusak (misalnya kegagalan kapasitor) juga dapat menyebabkan kedipan atau tidak ada daya.
- ✅Memperbaiki:
- Verifikasi polaritas menggunakan multimeter sebelum menyambungkan kembali.
- Tegangan keluaran driver uji. Ganti jika mati atau tidak stabil.


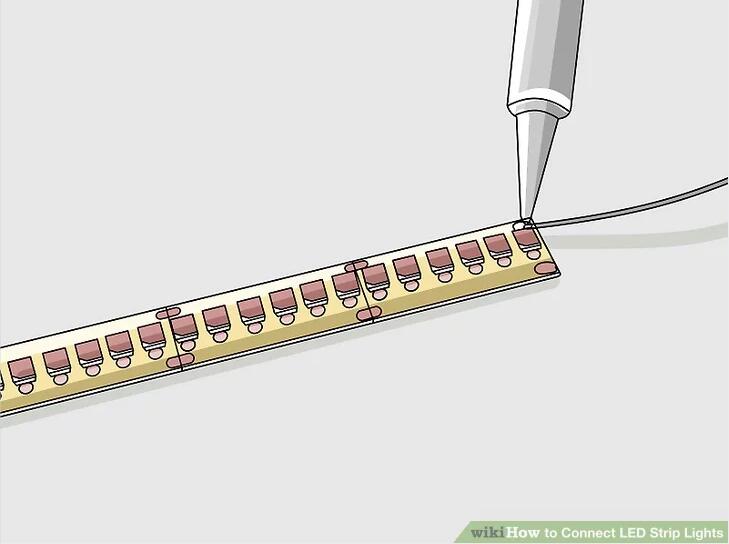
5.Penyolderan atau Konektor Buruk
Sambungan solder yang longgar atau konektor berkualitas rendah menimbulkan hambatan, sehingga menyebabkan peredupan atau kesalahan yang terputus-putus.
- ✅Memperbaiki:
- Gunakansolder inti rosin 60/40 pada suhu 300°C untuk sambungan yang aman.
- Pilih konektor 4-pin tahan air untuk strip RGB.

Tips Pencegahan dari Lightstec
- Selalu uji strip dengan baterai 3V sebelum pemasangan.
- Tambahkan saluran aluminium untuk pembuangan panas jika diperpendek >50%.
- Gunakan driver denganKapasitas 20% lebih tinggi daripada kebutuhan yang dihitung.
- Hindari memotongtegangan tinggi (120V/220V) strip—ganti bagian yang rusak.
FAQ
T: Dapatkah saya menghubungkan kembali potongan -potongan tanpa solder?
A: Ya! Gunakan konektor 4-pin tanpa solder (ideal untuk RGB), tetapi pastikan bantalan tembaga bersih.
T: Mengapa beberapa LED tetap redup setelah memotong?
A: Kemungkinan karena penurunan tegangan. Instal aStrip 24v atau tambahkan titik injeksi daya.
T: Bagaimana cara memotong air tahan air?
A: Segel dengan konektor gel silikon atau resin epoksi.
Kapan Harus Mengganti vs. Memperbaiki
- ✅Dapat diperbaiki: Luka bakar ringan, luka bersih pada titik yang ditandai, driver berfungsi.
- ❌Mengganti: Bantalan terkorosi, bekas sirkuit terbakar, atau kerusakan akibat air.
Dukungan Profesional Lightstec
Sebagai pemasok langsung pabrik, kami menyediakan:
- Gratispanduan pemotongan dan kalkulator tegangan.
- Driver dan konektor khusus untuk pesanan massal.
- Dukungan teknis 24/7 melalui [[email protected]].
Butuh solusi OEM/ODM? [Hubungi Lightstec] untuk strip LED yang tahan lama dan dipotong sesuai ukuran dengan garansi 5 tahun.


Tentang Penulis
JerryHu
Pendiri Lightstec. Gelar Teknik. Lebih dari 13 tahun pengalaman kerja dalam bisnis lampu led. Familiar dengan produksi produk lampu led. Blog ini berbagi pengetahuan dan solusi dalam pencahayaan led. Selamat datang sumber lampu led dari China.
Pelajari Lebih Banyak Kelas Led Profesional yang Lebih Sedikit Diberitahukan Orang Sebelum Anda Membuat Kesalahan.


